OKD 4 Single Node Cluster
Note: This project is deprecated.
I’ve moved this over to my Blog: https://upstreamwithoutapaddle.com
The new post is here: https://upstreamwithoutapaddle.com/blog%20post/2023/03/06/Back-To-Where-It-All-Started.html
This project is no longer maintained. See the link above for an updated guide.
Host setup:
You need to start with a minimal CentOS Stream, Fedora, or CentO-8 install. (This tutorial assumes that you are comfortable installing a Linux OS.)
Download the minimal install ISO from: http://isoredirect.centos.org/centos/8-stream/isos/x86_64/
Use a tool like balenaEtcher to create a bootable USB key from a CentOS ISO.
You will have to attach monitor, mouse, and keyboard to your NUC for the install. After the install, this machine can be headless.
- Network:
- Configure the network interface with a fixed IP address.
- Set the system hostname to
snc-host
- Storage:
- Take the default sizes for /boot and swap.
- Do not create a
/homefilesystem (no users on this system) Allocate all of the remaining space for the/filesystem
After the installation completes, ensure that you can ssh to your host.
ssh root@10.11.11.10 <sub for your host IP>
Install packages:
dnf -y module install virt
dnf -y install wget git net-tools bind bind-utils bash-completion rsync libguestfs-tools virt-install epel-release libvirt-devel httpd-tools nginx
Set up KVM:
systemctl enable libvirtd --now

mkdir /VirtualMachines
virsh pool-destroy default
virsh pool-undefine default
virsh pool-define-as --name default --type dir --target /VirtualMachines
virsh pool-autostart default
virsh pool-start default
Set up nginx:
systemctl enable nginx --now
mkdir -p /usr/share/nginx/html/install/fcos/ignition
Configure the firewall:
firewall-cmd --permanent --add-service=http
firewall-cmd --permanent --add-service=https
firewall-cmd --permanent --add-service=dns
firewall-cmd --reload
Create an SSH key pair: (Take the defaults for all of the prompts, don’t set a key passphrase)
ssh-keygen -t ed25519 -N "" -f /root/.ssh/id_ed25519
Clone this repository:
mkdir -p /root/okd4-snc
cd /root/okd4-snc
git clone https://github.com/cgruver/okd4-single-node-cluster.git
cd okd4-single-node-cluster
Copy the utility scripts to your local bin directory:
mkdir ~/bin
cp ./bin/* ~/bin
chmod 750 ~/bin/*
Ensure that ~/bin is in your $PATH. Modify ~/.bashrc if necessary.
One of the included utility scripts will set environment variables for the install.
Modify ~/bin/setSncEnv.sh to reflect your network settings. You will need to set a domain that will be used in the DNS setup.
| Variable | Example Value | Description |
|---|---|---|
SNC_DOMAIN |
snc.test |
The domain that you want for your lab. This will be part of your DNS setup |
SNC_HOST |
10.11.11.10 |
The IP address of your snc-host host. |
SNC_NAMESERVER |
${SNC_HOST} |
The IP address of your snc-host host. |
SNC_NETMASK |
255.255.255.0 |
The netmask of your local network |
SNC_GATEWAY |
10.11.11.1 |
The IP address of your local router |
MASTER_HOST |
10.11.11.150 |
The IP address for your SNC master node |
BOOTSTRAP_HOST |
10.11.11.149 |
The IP address for your bootstrap node |
SNC_NETWORK |
10.11.11.0/24 |
The network and mask for you lab, assumes /24 |
INSTALL_HOST_IP |
${SNC_HOST} |
The IP address of your snc-host host. |
INSTALL_ROOT |
/usr/share/nginx/html/install |
The directory that will hold Fedora CoreOS install images |
INSTALL_URL |
http://${SNC_HOST}/install |
The URL for Fedora CoreOS installation |
OKD4_SNC_PATH |
/root/okd4-snc |
The path from which we will build our OKD4 cluster |
OKD_REGISTRY |
quay.io/openshift/okd |
The URL for the OKD4 stable build images |
After you you have completed any necessary modifications, add this script to ~/.bashrc so that it will execute on login.
echo ". /root/bin/setSncEnv.sh" >> ~/.bashrc
Now, set the environment in your local shell:
. /root/bin/setSncEnv.sh
Network Bridge:
Next, we need to set your host up for bridged networking so that your single node cluster will have an IP address that you can access on your local network.
You need to identify the NIC that you configured when you installed this host. It will be something like eno1, or enp108s0u1
ip addr
You will see out put like:
1: lo: <LOOPBACK,UP,LOWER_UP> mtu 65536 qdisc noqueue state UNKNOWN group default qlen 1000
link/loopback 00:00:00:00:00:00 brd 00:00:00:00:00:00
inet 127.0.0.1/8 scope host lo
       valid_lft forever preferred_lft forever
inet6 ::1/128 scope host
       valid_lft forever preferred_lft forever
2: eno1: <BROADCAST,MULTICAST,UP,LOWER_UP> mtu 1500 qdisc pfifo_fast state UP group default qlen 1000
link/ether 1c:69:7a:03:21:e9 brd ff:ff:ff:ff:ff:ff
inet 10.11.11.10/24 brd 10.11.11.255 scope global noprefixroute eno1
       valid_lft forever preferred_lft forever
inet6 fe80::1e69:7aff:fe03:21e9/64 scope link
       valid_lft forever preferred_lft forever
3: wlp0s20f3: <NO-CARRIER,BROADCAST,MULTICAST,UP> mtu 1500 qdisc mq state DOWN group default qlen 1000
link/ether ca:33:7a:77:8e:e4 brd ff:ff:ff:ff:ff:ff
Somewhere in the output will be the interface that you configured with your snc-host IP address. Find it and set a variable with that value:
PRIMARY_NIC="eno1"
Create a network bridge device named br0 (This lab assumes your NETMASK is 255.255.255.0.)
nmcli connection add type bridge ifname br0 con-name br0 ipv4.method manual ipv4.address "${SNC_HOST}/24" ipv4.gateway "${SNC_GATEWAY}" ipv4.dns "${SNC_NAMESERVER}" ipv4.dns-search "${SNC_DOMAIN}" ipv4.never-default no connection.autoconnect yes bridge.stp no ipv6.method ignore
Create a bind device for your primary NIC:
nmcli con add type ethernet con-name br0-bind-1 ifname ${PRIMARY_NIC} master br0
Delete the configuration of the primary NIC:
nmcli con del ${PRIMARY_NIC}
Recreate the configuration file for the primary NIC:
nmcli con add type ethernet con-name ${PRIMARY_NIC} ifname ${PRIMARY_NIC} connection.autoconnect no ipv4.method disabled ipv6.method ignore
Restart networking and make sure everything is working properly:
systemctl restart NetworkManager.service
You can now test DNS resolution. Try some ping or dig commands.
ping redhat.com
Update and shutdown the SNC host:
dnf -y update && shutdown -h now
Disconnect the keyboard, mouse, and display. Your host is now headless.
Power the host up, log in via SSH, and continue the snc-host host set up.
DNS Configuration:
OKD requires a DNS configuration. To satisfy that requirement, we will set up bind. Do not do this on a system already configured for DNS. This will destroy your current configuration.
This tutorial includes stub files and a utility script to set up named for you. These files will go into your /etc directory.
/etc/named.conf
/etc/named/named.conf.local
/etc/named/zones/db.snc_ptr
/etc/named/zones/db.snc.test
To set up DNS:
systemctl enable named
setupDNS.sh
Now let’s talk about this configuration, starting with the A records, (forward lookup zone).
/etc/named/zones/db.snc.test
- The SNC Host is
snc-host. - The Bootstrap node is
okd4-snc-bootstrap. - The Master node for the single node cluster is
okd4-snc-master. - The etcd host is also the master node
etcd-0 -
There is one wildcard record that OKD needs:
okd4-sncis the name of the cluster.*.apps.okd4-snc.your.domain.orgThe “apps” record will be for all of the applications that you deploy into your OKD cluster.
This wildcard A record needs to point to the entry point for your OKD cluster. In this case, the wildcard A record will point to the IP address of your single master node.
-
There are two A records for the Kubernetes API, internal & external.
api.okd4-snc.your.domain.org. IN A 10.10.11.150 api-int.okd4-snc.your.domain.org. IN A 10.10.11.150 -
There is one SRV record for the etcd host, which is also the master node.
_etcd-server-ssl._tcp.okd4-snc.your.domain.org 86400 IN SRV 0 10 2380 etcd-0.okd4.your.domain.org. -
We are going to take advantage of DNS round-robin for this installation, since we are not using an external load balancer. Thus, there are duplicate entries for the
apiandapi-intA records. The duplicate entries point to the bootstrap node. These entries will be removed when the cluster bootstrap is completed.api.okd4-snc.your.domain.org. IN A 10.10.11.149 ; remove after bootstrap api-int.okd4-snc.your.domain.org. IN A 10.10.11.149 ; remove after bootstrap
Hugely Helpful Tip:
If you are using a MacBook for your workstation, you can enable DNS resolution to your lab by creating a file in the /etc/resolver directory on your Mac.
sudo bash
<enter your password>
vi /etc/resolver/your.domain.com
Name the file your.domain.com after the domain that you created for your SNC lab. Enter something like this example, modified for your DNS server’s IP:
nameserver 10.11.11.10
Save the file.
Your MacBook should now query your new DNS server for entries in your new domain. Note: If your MacBook is on a different network and is routed to your Lab network, then the acl entry in your DNS configuration must allow your external network to query. Otherwise, you will bang your head wondering why it does not work…
Prepare to Install the OKD 4.7 Single Node Cluster
I have provided a set of utility scripts to automate a lot of the tasks associated with deploying and tearing down an your OKD cluster. In your ~/bin directory you will see the following:
DeployOkdSnc.sh |
Creates the Bootstrap and Master nodes, and starts the installation |
DestroyBootstrap.sh |
Destroys the Bootstrap node |
UnDeploySncNode.sh |
Destroys the single node cluster |
Retrieve the oc command. We’re going to grab a recent, but not exact version of oc, but that’s OK. We just need it to retrieve the current versions of oc and openshift-install
Go to: https://github.com/openshift/okd/releases/tag/4.7.0-0.okd-2021-03-07-090821 and retrieve the openshift-client-linux-4.7.0-0.okd-2021-03-07-090821.tar.gz archive.
cd ${OKD4_SNC_PATH}
wget https://github.com/openshift/okd/releases/download/4.7.0-0.okd-2021-03-07-090821/openshift-client-linux-4.7.0-0.okd-2021-03-07-090821.tar.gz
Uncompress the archive and move the oc executable to your ~/bin directory.
tar -xzf openshift-client-linux-4.7.0-0.okd-2021-03-07-090821.tar.gz
mv oc ~/bin
mv kubectl ~/bin
rm -f openshift-client-linux-4.7.0-0.okd-2021-03-07-090821.tar.gz
rm -f README.md
The DeployOkdSnc.sh script will pull the correct version of oc and openshift-install when we run it. It will over-write older versions in ~/bin.
We need to configure the environment to pull a current version of OKD. So point your browser at https://origin-release.svc.ci.openshift.org.
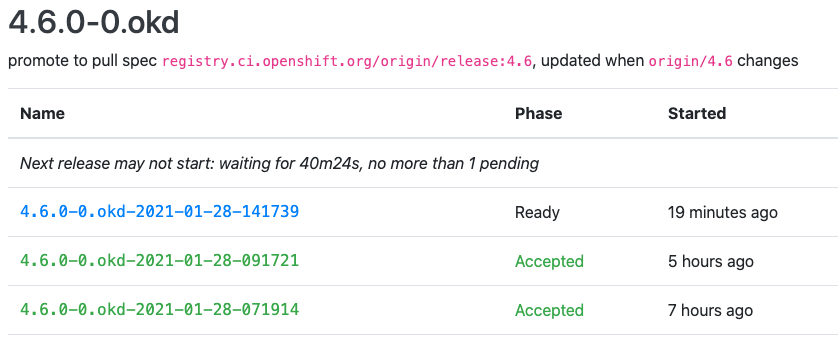
Select the most recent 4.7.0-0.okd release from the 4-stable stream that is in a Phase of Accepted, and copy the release name into an environment variable:
export OKD_RELEASE=4.7.0-0.okd-2021-03-07-090821
The next step is to prepare the install-config.yaml file that openshift-install will use it to create the ignition files for bootstrap and master nodes.
I have prepared a skeleton file for you in this project, ./install-config-snc.yaml.
apiVersion: v1
baseDomain: %%SNC_DOMAIN%%
metadata:
  name: okd4-snc
networking:
  networkType: OpenShiftSDN
  clusterNetwork:
  - cidr: 10.100.0.0/14
    hostPrefix: 23
  serviceNetwork:
  - 172.30.0.0/16
compute:
- name: worker
  replicas: 0
controlPlane:
  name: master
  replicas: 1
platform:
  none: {}
pullSecret: '{"auths":{"fake":{"auth": "Zm9vOmJhcgo="}}}'
sshKey: %%SSH_KEY%%
Copy this file to our working directory.
cp ${OKD4_SNC_PATH}/okd4-single-node-cluster/install-config-snc.yaml ${OKD4_SNC_PATH}/install-config-snc.yaml
Patch in some values:
sed -i "s|%%SNC_DOMAIN%%|${SNC_DOMAIN}|g" ${OKD4_SNC_PATH}/install-config-snc.yaml
SSH_KEY=$(cat ~/.ssh/id_ed25519.pub)
sed -i "s|%%SSH_KEY%%|${SSH_KEY}|g" ${OKD4_SNC_PATH}/install-config-snc.yaml
Your install-config-snc.yaml file should now look something like:
apiVersion: v1
baseDomain: snc.test
metadata:
  name: okd4-snc
networking:
  networkType: OpenShiftSDN
  clusterNetwork:
  - cidr: 10.100.0.0/14
    hostPrefix: 23
  serviceNetwork:
  - 172.30.0.0/16
compute:
- name: worker
  replicas: 0
controlPlane:
  name: master
  replicas: 1
platform:
  none: {}
pullSecret: '{"auths":{"fake":{"auth": "Zm9vOmJhcgo="}}}'
sshKey: ssh-ed25519 AAAAC3NREDACTED1xwuiuVigoq root@snc-host
Installation of our Single Node Cluster
Create the cluster virtual machines and start the OKD installation:
cd ${OKD4_SNC_PATH}
DeployOkdSnc.sh
This script does a whole lot of work for you:
- It will pull the current versions of
ocandopenshift-installbased on the value of${OKD_RELEASE}that we set previously. - Copies the install-config-snc.yaml file to the install directory as install-config.yaml.
- Invokes the openshift-install command against our install-config to produce ignition files
- Modifies the ignition files for the SNC node IP configruation
- Copies the ignition files into place for FCOS install
- Pulls the requested Fedora CoreOS release based on the values of
${FCOS_VER}and${FCOS_STREAM} - Creates a bootable ISO for the Bootstrap and Master nodes with a customized
isolinux.cfgfile. - Creates the guest VMs for the Boostrap and Master nodes.
- Starts the VMs and begins the installation process.
Because the DeployOkdSnc.sh script disconnects from the VM before installation completes, the VM will not restart after the Fedora CoreOS installation. The VMs will shutdown instead.
You can watch the install:
virsh console okd4-snc-bootstrap
virsh console okd4-snc-master
When the install is complete, the VMs will be shutdown:
virsh list --all

       Id    Name                           State
----------------------------------------------------
       -     okd4-snc-bootstrap             shut off
       -     okd4-snc-master                shut off
- Restart the VMs to begin the OKD Cluster installation:
virsh start okd4-snc-bootstrap
virsh start okd4-snc-master
Now let’s sit back and watch the install:
In a separate terminal, execute the following to monitor the Bootstrap progress:
openshift-install --dir=${OKD4_SNC_PATH}/okd4-install-dir wait-for bootstrap-complete --log-level debug
You will see output similar to:
DEBUG OpenShift Installer 4.7.0-0.okd-2021-03-07-090821
DEBUG Built from commit a005bb9eddcbc97e4cac2cdf4436fe2d524cc75e
INFO Waiting up to 20m0s for the Kubernetes API at https://api.okd4-snc.snc.test:6443...
DEBUG Still waiting for the Kubernetes API: Get "https://api.okd4-snc.snc.test:6443/version?timeout=32s": dial tcp 10.11.11.150:6443: i/o timeout
DEBUG Still waiting for the Kubernetes API: Get "https://api.okd4-snc.snc.test:6443/version?timeout=32s": dial tcp 10.11.11.149:6443: connect: connection refused
This will take a while, be patient.
Patch etcd for Single Node Configuration:
When you see the following:
INFO API v1.20.0-1046+5fbfd197c16d3c-dirty up
INFO Waiting up to 30m0s for bootstrapping to complete...
We need to apply a configuration patch to etcd
Execute the following until you see that the etcd configuration is created:
export KUBECONFIG="${OKD4_SNC_PATH}/okd4-install-dir/auth/kubeconfig"
oc get etcd cluster
You will see output similat to:
[root@snc-host ~]# oc get etcd cluster
error: the server doesn't have a resource type "etcd"
[root@snc-host ~]# oc get etcd cluster
NAME      AGE
cluster   4m33s
When etcd is configured, run the following to patch the config:
oc patch etcd cluster -p='{"spec": {"unsupportedConfigOverrides": {"useUnsupportedUnsafeNonHANonProductionUnstableEtcd": true}}}' --type=merge
If you want to watch something happening, see “Watching Bootstrap and Install processes in more detail” below.
When the Bootstrap process is complete, you will see the following:
DEBUG Bootstrap status: complete
INFO It is now safe to remove the bootstrap resources
DEBUG Time elapsed per stage:
DEBUG Bootstrap Complete: 14m9s
DEBUG                API: 3m56s
INFO Time elapsed: 14m9s
Now, destroy the Bootstrap node.
DestroyBootstrap.sh
Patch operators for Single Node Configuration:
We need to patch two of the operators for the install to complete successfully:
export KUBECONFIG="${OKD4_SNC_PATH}/okd4-install-dir/auth/kubeconfig"
oc patch IngressController default -n openshift-ingress-operator -p='{"spec": {"replicas": 1}}' --type=merge
oc patch authentications.operator.openshift.io cluster -p='{"spec": {"unsupportedConfigOverrides": {"useUnsupportedUnsafeNonHANonProductionUnstableOAuthServer": true }}}' --type=merge
Complete the install
Watch the installation process through to completion:
openshift-install --dir=${OKD4_SNC_PATH}/okd4-install-dir wait-for install-complete --log-level debug
You will see output similar to:
DEBUG OpenShift Installer 4.7.0-0.okd-2021-03-07-090821
DEBUG Built from commit a005bb9eddcbc97e4cac2cdf4436fe2d524cc75e
DEBUG Loading Install Config...
DEBUG   Loading SSH Key...
DEBUG   Loading Base Domain...
DEBUG     Loading Platform...
DEBUG   Loading Cluster Name...
DEBUG     Loading Base Domain...
DEBUG     Loading Platform...
DEBUG   Loading Networking...
DEBUG     Loading Platform...
DEBUG   Loading Pull Secret...
DEBUG   Loading Platform...
DEBUG Using Install Config loaded from state file
INFO Waiting up to 40m0s for the cluster at https://api.okd4-snc.snc.test:6443 to initialize...
DEBUG Still waiting for the cluster to initialize: Working towards 4.7.0-0.okd-2021-03-07-090821: 38 of 669 done (5% complete)
DEBUG Still waiting for the cluster to initialize: Working towards 4.7.0-0.okd-2021-03-07-090821: 413 of 669 done (61% complete)
Install Complete:
You will see output that looks like:
DEBUG Cluster is initialized
INFO Waiting up to 10m0s for the openshift-console route to be created...
DEBUG Route found in openshift-console namespace: console
DEBUG OpenShift console route is admitted
INFO Install complete!
INFO To access the cluster as the system:admin user when using 'oc', run 'export KUBECONFIG=/root/okd4-snc/okd4-install-dir/auth/kubeconfig'
INFO Access the OpenShift web-console here: https://console-openshift-console.apps.okd4-snc.snc.test
INFO Login to the console with user: "kubeadmin", and password: "pYQmG-UIttv-LEs5Y-7NZmf"
DEBUG Time elapsed per stage:
DEBUG Cluster Operators: 7m3s
INFO Time elapsed: 7m3s
Log into your new cluster console:
Point your browser to the url listed at the completion of install: https://console-openshift-console.apps.okd4-snc.snc.test
Log in as kubeadmin with the password from the output at the completion of the install.
__If you forget the password for this initial account, you can find it in the file: ${OKD4_SNC_PATH}/okd4-install-dir/auth/kubeadmin-password
Issue commands against your new cluster:
export KUBECONFIG="${OKD4_SNC_PATH}/okd4-install-dir/auth/kubeconfig"
oc get pods --all-namespaces
Set up htpasswd Authentication:
Create an htpasswd file with two users. The user admin will be assigned the password that was created when you installed your cluster. The user devuser will be assigned the password devpwd. THe user devuser will have default permissions.
mkdir -p ${OKD4_SNC_PATH}/okd-creds
htpasswd -B -c -b ${OKD4_SNC_PATH}/okd-creds/htpasswd admin $(cat ${OKD4_SNC_PATH}/okd4-install-dir/auth/kubeadmin-password)
htpasswd -b ${OKD4_SNC_PATH}/okd-creds/htpasswd devuser devpwd
Now, create a Secret with this htpasswd file:
oc create -n openshift-config secret generic htpasswd-secret --from-file=htpasswd=${OKD4_SNC_PATH}/okd-creds/htpasswd
Create the Htpasswd Identity Provider:
I have provided an Identity Provider custom resource configuration located at ./htpasswd-cr.yaml in this project.
oc apply -f ${OKD4_SNC_PATH}/okd4-single-node-cluster/htpasswd-cr.yaml
Make the user admin a Cluster Administrator:
oc adm policy add-cluster-role-to-user cluster-admin admin
Now, log into the web console as your new admin user to verify access. Select the Htpasswd provider when you log in.
Finally, remove temporary user:
oc delete secrets kubeadmin -n kube-system
Create an Empty volume for registry storage:
oc patch configs.imageregistry.operator.openshift.io cluster --type merge --patch '{"spec":{"managementState":"Managed","storage":{"emptyDir":{}}}}'
Configure the Image Pruner:
oc patch imagepruners.imageregistry.operator.openshift.io/cluster --type merge -p '{"spec":{"schedule":"0 0 * * *","suspend":false,"keepTagRevisions":3,"keepYoungerThan":60,"resources":{},"affinity":{},"nodeSelector":{},"tolerations":[],"startingDeadlineSeconds":60,"successfulJobsHistoryLimit":3,"failedJobsHistoryLimit":3}}'
Watching Bootstrap and Install processes in more detail:
To watch a node boot and install:
-
Bootstrap node:
virsh console okd4-snc-bootstrap -
Master Node:
virsh console okd4-snc-master
Once a host has installed FCOS you can monitor the install logs:
-
Bootstrap Node:
ssh -o StrictHostKeyChecking=no -o UserKnownHostsFile=/dev/null core@okd4-snc-bootstrap "journalctl -b -f -u release-image.service -u bootkube.service" -
Master Node:
ssh -o StrictHostKeyChecking=no -o UserKnownHostsFile=/dev/null core@okd4-snc-master "journalctl -b -f -u kubelet.service"
If it all goes pancake shaped during the install:
Gather logs from the bootstrap and master nodes:
openshift-install --dir=okd4-install gather bootstrap --bootstrap 10.11.11.149 --master 10.11.11.150